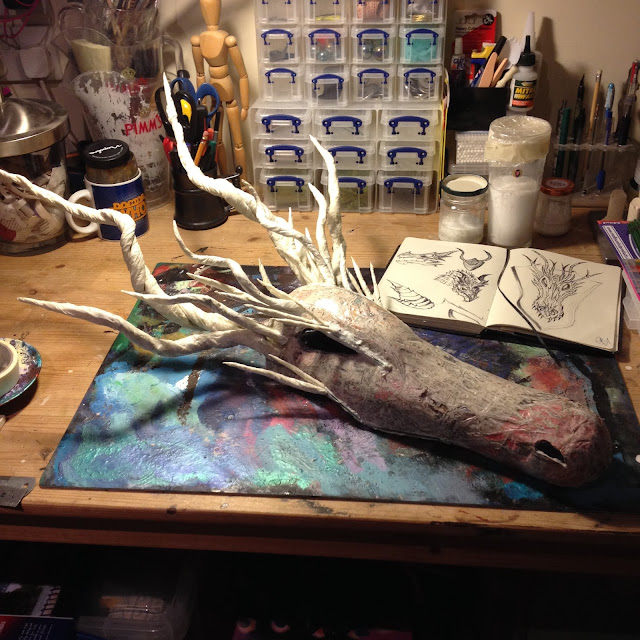
I've also been working on my dragon skull, however progress has been much slower than I had hoped for as such a large piece requires a lot of time, something I'm lacking currently! What progress I have made is detailed as follows...
With the main skull shaped and sanded it was time to add the surface details such as horns and more detailed contours to the shape of the skull. My first step in this new stage was to begin attaching the large main horns. These would give a greater impression of how the whole skull would look in the end while I built up smaller details around them. I started with the largest horns and worked my way down to the smaller ones, the reason for developing the skull in this order was I found it easier to establish the position of large pieces and how the conceal the joins on them with smaller horns and surface layers. I didn't have an outlined design on where pieces would go, instead adopting a style where I decided on the positioning of things as I went. However, I was always conscious of creating a flow to the way the horns protruded from the skull, this would give a more organic and anatomical feel to the surface, that was my ultimate goal.
Building up clusters of horns along the surface of the skull gave a much more credible and organic look to the whole piece. The final finish on the surface would really show this off so it was important to take the time to get this right and make sure all the elements flowed fairly symmetrically and looked realistic.
This building up of horn clusters along the eye socket and brow also created more character in the skull, I wanted to give just enough detail you could tell where scales and flesh would hang on the surface if it were added on.
The step was the teeth, this really added a lot of character and detail to the skull. Using polymer clay I sculpted and baked teeth that were more robust and hardy than the needle-like ones I had made for the sea dragon trophy.
I placed the teeth in clusters along the jaw line to give a natural and authentic look. I also had to consider where the teeth would be placed on the lower jaw bone so that they would all line up evenly if the jaws were closed. I still wasn't sure whether I was going to use the lower jaw. Ultimately I did and it was definitely the right decision, but for a time I thought about just focusing on the top half as one solid piece.
It took a while to work out exactly how wide I wanted the jaw to be set, considering at one point having it closed. In the end I opened it up to what I thought would be a natural resting point in the joints, not too wide and exaggerated, but enough to show the mechanics of it.
I also built up more of a beak like shape to the front of the skull. I felt this gave a more realistic look to the whole shape and made it a bit more believable.After attaching the lower jaw the whole skull really started to come together. At one point the lower jaw did actually crumble in certain areas, not having the structural rigidity of the upper section. I had to go back into it with a lot more wire and hot glue, which added more weight to the whole thing but mde sure nothing would fall apart again!
After successive layers of wood adhesive on the whole structure it was time to move on to the jesmonite stage. This would really add a bone-like finish to the surface not just it look but feel as well. I mixed up different consistencies depending on the section I was coating. For example, the main surface of the skull had thick evenly spread layer of jesmonite, built up in certain patches to level off and create contours along the surface, where s the horns had a thinner coat applied on top of one another to finish the surface without obscuring detail.
Sanding this back roughly and then with finer grits gave a polished, smooth finish too the skull.
At this stage the skull was coming along nicely, however, it was taking up a lot of room and still required alot of work on its surface I couldn't currently commit too. I therefore decided to knock up the shield tht would support the skull on the wall, getting it out of the way for the time being until I could complete it.
Unlike the shield/plaque for the sea dragon, the skull hooked on to the shield I made this time round, allowing it to be removed whenever needs be.
I had to build up layers on the shield to accomodate the horns on the skull so they were far enough away from the wall to sit on the shield and lie up. The hook you can see above was cut and shaped to sit snugly inside the top of the skull.
This is the stage I am currently up to with the skull. It still needs a fair bit of rubbing down on the surface, especially round the larger horns and teeth. The shield itself also needs painting and possibly routering. In terms of the finish on the skull I'm looking at some sort of off white stains and blemishes to age the surface and highlight the contours, possibly darkening the horns too. Hopefully I'll be able to show the finished piece in the near future! Next blog will be on other projects I'm looking at getting up and running, ciao for now!


No comments:
Post a Comment