Tuesday, 17 November 2015

Catch Up - Dragon Skull progress

Its been a while since my last post and that's mainly due to work taking up a lot of my time recently. I've been trying to develop a few personal projects but the irony of a creative job is it can absorb that portion of your life! However, I've been doing a lot of sketching as this is less of a commitment and a good way of developing new ideas for more major art further down the line. This is something I've been doing for years but recently took up again as I can fit it in here and there, wherever I happen to be.

I've also been working on my dragon skull, however progress has been much slower than I had hoped for as such a large piece requires a lot of time, something I'm lacking currently! What progress I have made is detailed as follows...

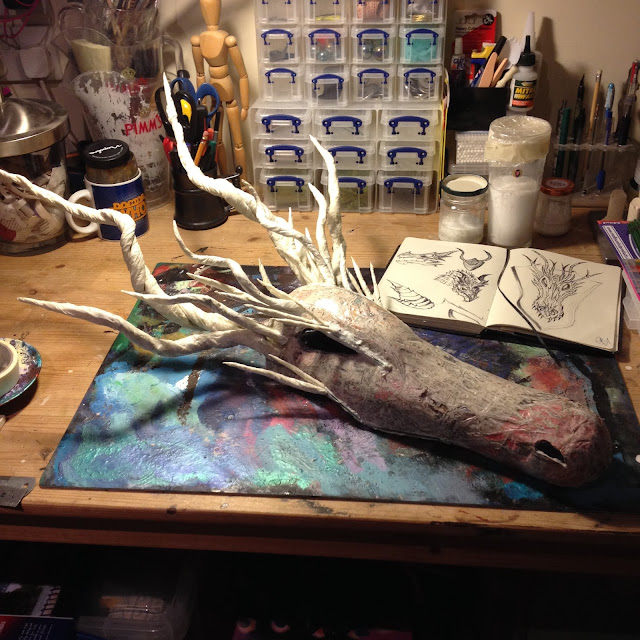
With the main skull shaped and sanded it was time to add the surface details such as horns and more detailed contours to the shape of the skull. My first step in this new stage was to begin attaching the large main horns. These would give a greater impression of how the whole skull would look in the end while I built up smaller details around them. I started with the largest horns and worked my way down to the smaller ones, the reason for developing the skull in this order was I found it easier to establish the position of large pieces and how the conceal the joins on them with smaller horns and surface layers. I didn't have an outlined design on where pieces would go, instead adopting a style where I decided on the positioning of things as I went. However, I was always conscious of creating a flow to the way the horns protruded from the skull, this would give a more organic and anatomical feel to the surface, that was my ultimate goal.


Building up clusters of horns along the surface of the skull gave a much more credible and organic look to the whole piece. The final finish on the surface would really show this off so it was important to take the time to get this right and make sure all the elements flowed fairly symmetrically and looked realistic.


This building up of horn clusters along the eye socket and brow also created more character in the skull, I wanted to give just enough detail you could tell where scales and flesh would hang on the surface if it were added on.

The step was the teeth, this really added a lot of character and detail to the skull. Using polymer clay I sculpted and baked teeth that were more robust and hardy than the needle-like ones I had made for the sea dragon trophy.


I placed the teeth in clusters along the jaw line to give a natural and authentic look. I also had to consider where the teeth would be placed on the lower jaw bone so that they would all line up evenly if the jaws were closed. I still wasn't sure whether I was going to use the lower jaw. Ultimately I did and it was definitely the right decision, but for a time I thought about just focusing on the top half as one solid piece.


It took a while to work out exactly how wide I wanted the jaw to be set, considering at one point having it closed. In the end I opened it up to what I thought would be a natural resting point in the joints, not too wide and exaggerated, but enough to show the mechanics of it.


I also built up more of a beak like shape to the front of the skull. I felt this gave a more realistic look to the whole shape and made it a bit more believable.After attaching the lower jaw the whole skull really started to come together. At one point the lower jaw did actually crumble in certain areas, not having the structural rigidity of the upper section. I had to go back into it with a lot more wire and hot glue, which added more weight to the whole thing but mde sure nothing would fall apart again!

After successive layers of wood adhesive on the whole structure it was time to move on to the jesmonite stage. This would really add a bone-like finish to the surface not just it look but feel as well. I mixed up different consistencies depending on the section I was coating. For example, the main surface of the skull had  thick evenly spread layer of jesmonite, built up in certain patches to level off and create contours along the surface, where s the horns had a thinner coat applied on top of one another to finish the surface without obscuring detail.

Sanding this back roughly and then with finer grits gave a polished, smooth finish too the skull.


At this stage the skull was coming along nicely, however, it was taking up a lot of room and still required alot of work on its surface I couldn't currently commit too. I therefore decided to knock up the shield tht would support the skull on the wall, getting it out of the way for the time being until I could complete it.

Unlike the shield/plaque for the sea dragon, the skull hooked on to the shield I made this time round, allowing it to be removed whenever needs be.


I had to build up layers on the shield to accomodate the horns on the skull so they were far enough away from the wall to sit on the shield and lie up. The hook you can see above was cut and shaped to sit snugly inside the top of the skull.


This is the stage I am currently up to with the skull. It still needs a fair bit of rubbing down on the surface, especially round the larger horns and teeth. The shield itself also needs painting and possibly routering. In terms of the finish on the skull I'm looking at some sort of off white stains and blemishes to age the surface and highlight the contours, possibly darkening the horns too. Hopefully I'll be able to show the finished piece in the near future! Next blog will be on other projects I'm looking at getting up and running, ciao for now!

Thursday, 20 August 2015

Dragon Skull Trophy

After my first dragon piece I wanted to create a second that was more stripped back and focused exclusively on the shape and design on a more basic level, but at the same time highlight and present that simplicity in a polished, refined way. Obviously this was a mythical creature but the aspects and details of my design were all taken from real animals to create a more authentic and anatomical look to the skull. Without the flesh, scales etc layering up the surface I would instead focus on the basic underlying shape. While in my previous piece it had been a good opportunity to experiment with different materials and techniques in building up the surface, this time I wanted to focus on a piece that was more basic in terms of surface quality but that rather than have a busy, detailed surface; really highlighted the curves and finishes of a skull.  As I wouldn't be building up the outer surface this gave me more of an opportunity to focus on the skull's details, such as horns, eye sockets, jaw line, etc.


I started by drawing up a few initial sketches to try and lock down exactly what I was going to make. I knew horns would play a major part of the designs having been inspired by a lot of taxidermy antlers and horns I had come across while researching. I wanted to create a different shaped head to what I had done last time, elongating the snout and creating a more fluid shape that flowed up to the horns and splayed out in an ornate and symmetrical way. As the smooth bone would form the outer finished layer it was important that the shape of the skull alone formed a striking shape as it would be fully exposed with no surface detail beyond colour washes and polishing.


The first step of construction was once again to get a rough shape of taped newspaper and build up lots of layers of paper mache to form a strong shell.


 While I waited for the skull to set solid I experimented with horn designs. I made up a number of large twisted horns consisting of coat hanger wire, newspaper and masking tape. Once I had a few I tried out different arrangements and curved shapes.


With the paper mache layers set I began refining and smoothing down the surface of the skull. Like my last piece I  cut the jaw out so both sections fit together seamlessly. I also cut out the eye socket and nostrils. Below you can see where I have removed the top section exposing the newspaper mould, I pulled all this out and neatened up both halves of the skull.


 After sanding down the surfaces to give a more organic look to the shape it was time to start attaching the horns and build up the other details of the skull.


Thursday, 28 May 2015

Stone Totem Pole

Back in April I began designing a totem pole for my sister's wedding at the beginning of May. The general theme she had decided on was a kind of bohemain styled festival at Talton Lodge just outside of Stratford upon Avon. The grounds had been developed as a venue space for functions and around the fields teepees, gypsy wagons and yurts with log burners had been dotted as part of the accomodation.


 My mum and sister had already began making and assembling decorations for the big twin teepees where the evening meal would be held after the ceremony. The look and feel of the day was a kind of rustic charm with hessian table cloths centered with chopped logs and pots of rosemary, dream catchers hung in chains high from the beams and hand made bars of soap and jars of family brewed honey as gifts among other things for the guests. On the table with the gifts I was going to make a totem pole to add to the theme and give a tribal, spiritual feel to the decorations, as well as a small table top teepee for wedding cards to be placed in.

 I started by collecting up a bunch of polystyrene bricks I had stored in the garage from years ago, one of those things you think will come in dead handy at some point even if you can't see yourself using them any time soon! They worked fantastically, pretty much like giant lego bricks that slotted together and locked in position but then also came apart easily for transportation. Looking back they hugely speeded up the whole process and let me focus on working the detailed into the surface.

I began by building them into a tower. Having researched a few different designs I considered how much space each creature would require and began very roughly marking out details on the blocks with a marker pen. My design remained pretty rough and mostly in my head. Rather than spend time going through the process of drawing up a detailed plan of what I was going to do I found it easier to get stuck into carving out the rough shape of the totem pole.


As I hadn't glued any of the blocks together yet it was easy to take out each section I was working on and focus on that rather than try to sculpt the whole piece at once. I tried to keep the design quite rough, giving the impression it had been roughly carved into rock. Providing just enough detail outline the features while giving the impression of a sculpture that had faded with time and exposure to the elements.


As I completed more of the detail on the surface I began smoothing the edges down to give a more weathered quality. This cleared up the surface and making the different blocks less distinguishable. Looking back it would of been an interesting idea to have made more of a point of the blocks forming the whole shape and smoothing off their edges to give a look of a totem pole formed from old stacked stones. However I decided to aim for a more solid shape as though it had been carved from a single standing stone. Adding a thick and very rough coat of jesmonite to the surface gave a much more weathered and earthy feel to the exterior of the shape. I left the design of the bricks in some sections as they were because some of the carved lines in them suited the looked I was going for, where on the sides of the totem pole the stone had been given less attention and simply chiseled roughly into the right shape.


After the jesmonite had dried off I began priming the totem pole with a dark grey base coat and adding white on each consecutive layer which I then dry brushed on to add definition and enhance the textured surface quality of the stone-look. At this stage the totem pole was really starting to take on the look of aged ruined stone, I decided to add blemishes and stains of natural hues like greens and browns to give the idea of where vegetation had encoached on the surface and eroded sections of the rock. After applying quite a strong hint, as you can see below, I worked back in a little of the lighter greys to obscure the stains a bit and just give the impression of colour on the surface.


After painting the totem pole I separated it into three sections which I glued together. These where then bubble wrapped making it easier to transport in the car rather than as one complete piece. Below are a couple of photos of the totem pole set up at the gift table in the entrance to the twin teepees at the wedding.