The next stage of development for me was to decide on some sort of design for the top of the structure. I decided to use the head of an old wooden dragon I had lying about. However as it was an oriental dragon I had to give it a bit of a trim here and there to make it look more british and in keeping with the style of the show.
 |
| The original head |
 |
| The head piece trimmed down and ready to be attached. |
Having altered the head I attached it to the top of the cap and clad the sides of the top cap in card. At this point I realised that I needed to do something in the design that would blend the head with the rest of the barber's pole. As at this point it stood out too much and didn't look part of the rest of the design. As can be seen below.
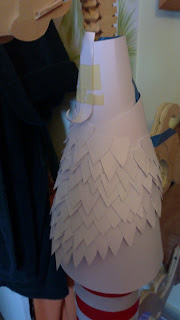
With the top and bottom both finally clad in card I had to decide on a design for the surface detail. I decided that in order to blend the dragon's head into the rest of the piece I would cut little scale-shaped plates out and cover the top half of the upper cap with them, spiralling up to the top. At the bottom I constructed a long spiralling tail. I imagined the two caps would have been constructed from metal, and in the case of the tail and scales, thin pieces of iron had been hammered on. This would give both an ornate and industrial mechanised look to the overall structure, tying in well with the victorian steampunk setting.
Here you can see the scale work progressing, orignally this was only goin to cover the right hand side as this would be the only side visible to the audience. However as it didn't take long to do I continued it all the way round.
The scale work completed. At this point the head was beginning to blend more with the rest of the barber's pole. Here you can also see the tail spiralling down towards the ground. I thought that by including this at the bottom it would tie in with the rest of the piece better.
Above the barber's pole is really starting to take shape, with most of the major construction elements complete. I also wrapped the main pole section with cling film. As it was finished I didnt want anything getting on its surface so covered it to protect it for the time being. I also knew I would eventually be spraying the rest of the structure black, so I got this out the way early.
My next step was to complete detailing the dragon's head. As it had originally been formed from strips of wood I wanted to make it look more smooth and metal- like. I decided to coat it in builder's cork and mould it around the gaps to give a more solid, sculpted look.
This also bridged the gap between the scales and the head itself making them appear one. Although not the most practical material to try and mould with, the builder's cork was cheap and air dried quickly. As I also have a lot of experiencee using it I was confident I could achieve the look I wanted.
 Once the builder's cork had dried and hardened I realised that the top and bottom caps were becoming lop sided. Perhaps due to the strain of the weigt or the position they had been in for so long they had begun to slip.I decided that before moving on I would have to rectify this problem or it could ruin the whole piece and lose its shape. I used masking tape to brace the top cap into the right position whilst I worked on it. For the bottom, I proped up the base with a bit of tubing so the whole thing would sit correctly whilst I adjusted the structure and secured it better. I then used a strip of hard board nailed into the bottom and secured round the rim with builder's cork to hold the bottom piece in place. With the top I worked around the masking tape supports with papier mache to hold the top section more closely to the wooden frame work.
With these supports in place the structure as a whole was more secure and sat perfectly in it's upright position. With only a little surface detail to finish and painting to do the barber's pole is nearly complete.
 |
| The barber's pole at this stage. |


No comments:
Post a Comment