Last week I continued working on the oven as well as attending a run of the first half of the play to get a feel for the performance side of things (having focused on the technical side of the show so far). This hugely helped me keep up to date with the show, I could look at the blocking of different scenes as well as what was still needed. Back in the workshop I began cutting out the back of the oven so it can be lit from through the grill.
In order to not cut into the oven itself I began by cutting a small hole with a jigsaw, I then made it progressively bigger until I was pleased with the over all look and size of the hole. As this exposed the loose underside of the paper layers I initially taped down any that weren't secure. Next I began to use more papier mache to secure them further, as well as laying them over the wood rim. This was because I was worried lose pieces of paper exposed to a strong beam of light for too long might end up catching alight, which wouldn't be great.
After I had done this I stopped working on the main oven for the time being and concentrated on the victorian motif I had yet to build for the crest of the oven.
I had sketched the design a number of times but as the play's theme was Steampunk I altered it slightly. What I came up with was a more complex design, perhaps to hard to build in 3D but one that incorporated both the flowing curves I had originally considered with a more man-made, artificial design.
 Here you can see as well as the ornate detail, the design also includes more rigid structures such as the gears and wheels. I thought this was more fitting but would be too complex to make. Not only that but I didn't have the time to dedicate to it, and from the audience's postiton they wouldn't see it very well anyway, especially if the lighting was dim. However, I still used it as my main design and would construct its outline, if not the interior detail.
Using air drying clay (I thought this was the most practical) I rolled out a sheet, roughly an inch thick, with a empty wine bottle. While doing this I noticed the surface of the wine bottle became cloudy and dusty-looking.
I thought this would be a perfect method for creating antique, old bottles for use in the scenes or on shelves behind the counter, etc.
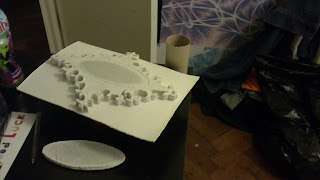
Once I had done this I used a photocopy of my design to trace the outline of the motif with a scalpel. This however proved very difficult so I cut out the design with a pair of scissors and followed as best I could. Although the overall piece I finished was different to what I had drawn it worked just as well.
 |
| The clay prior to carving. |
 |
| The design starts to take shape... |
 |
| The completed piece. |
To add to the three dimensional look I constructed an oval disc for the centre of the motif, which I then carved a border into. I then allowed it time to dry on a curved piece of card on top of the wine bottle, this would allow the curve of the oven to sit perfectly between the motif and surface of the oven.
Once it had finally dried a spent a good few days appying glue to the card so that it was completely secured to the clay and would be able hold on when placed upright. Once I was convinced there was no chance of the clay falling off it was ready to be taken into uni and attached to the main oven.
When I took the clay piece in this morning I used a huge amount of LX electrial tape to secure the clay to the oven. Although this might not sound like the most practical resource I find it is ten times more reliable than masking tape, and easier to paint over than the surface of selotape.
After attaching it I realised it would take alot of work with papier mache to get the piece looking as though it fitted against the oven smoothly. However, due to the curve I had let it dry in it sat quite happily on the oven's surface. This completed my work on the oven for the week.
 |
| The oven so far. |


No comments:
Post a Comment